- About This Document
- Who Should Use Harbour
- Harbour Is An Unusual Language
- CLI, GUI and Web Interfaces
- Rapid Application Development
- This Document Assumes Linux
- Harbour Keywords Are Case Insensitive
- Installation
- Harbour Hello World
- Hello World With Positioning
- Comments in Harbour
- Enabling Bright/Light Background Colors
- Introduction to Arrays
- Procedures and Functions
- Handling Command Line Arguments In Harbour
- Running External Programs From Harbour
- A Time Saving Compile/Run Script
- A Program To Display a Color Chart
- Hello World With Colors
- Adding An Input Field
- Harbour Menus
- Trivial Database Example
- Getting Harbour Info
- Where to Go From Here
About This Document
When driving a manual transmission car, the hardest task is to go from 0 to 5 miles per hour. Above five, it's pretty easy. Likewise, with Harbour, the hardest task is to learn the basics. Once you've learned the basics, learning the rest is pretty easy, and the actual coding is easy too. The purpose of this document is to get you from zero to five Miles Per Hour; to give you the basics.
Who Should Use Harbour
If you're thinking of learning Harbour language so people will pay you for programming, quit reading about Harbour right now, because plenty of languages are in much more demand. There's a strong market for Javascript variants, Ruby on Rails, Python, C++, C#, Java, and newer languages like Go, Rust and Haskell. Employers looking for Harbour or Clipper developers are extremely rare.
If you're thinking of learning Harbour to create beautiful, ornate Graphical User Interface (GUI) programs, you're probably better off with other languages and development environments.
Note:
The preceding paragraph is much less true if you choose to learn Xharbor, an offshoot of Harbour designed to better accommodate GUI programs.
If you're maintaining current Clipper code, Harbour's a great language for you but you probably know most of what's in this document.
Now let's get to who does need this document. If you're looking for a very quick way to create data aware computer programs with extremely fast input screen layout and extremely rapid creation of a program using Harbour's own .dbf data files, and you're willing to have these programs run in a Command Line Interface (CLI) instead of a GUI, then Harbour is exactly what you want. Development with CLI Harbour language is amazingly quick.
In spite of what I wrote in the preceding paragraph, the fact is that Harbour has extensions for web applications, GUI applications, and modern SQL databases. But those take longer to develop.
Another use I see on the horizon is using Harbour to replace shellscripting on Linux, BSD, and other semi-POSIX computer systems. Running external programs from Harbour code is much easier than from C, Python, etc. It's not quite as easy as from bash, dash, sh, etc, but the Harbour's syntax is much cleaner, and loops can execute much faster. I'll be getting more information on this in the future.
Harbour Is An Unusual Language
Harbour is an unusual language, especially by today's standards. It's very different from C, Java, Javascript, Python, or Ruby. This makes the early learning curve steep, although later everything becomes obvious.
Adding to the steep early learning curve is the fact that it's hard to get answers by searching the web. First, the Harbour documentation is thorough, but it's ill suited for quickly finding something specific. You're often better using the word "clipper" than "harbour" in your web searches, or use them both. But even then, because these are such common words, the majority of search hits have nothing to do with a computer language.
When searching for a command or function with a search engine, one result is always Harbour's Clipper Reference Guide. Unfortunately, this is a huge document, and for some odd reason the search engines drop you at the top instead of going to the function's section in the document. So you need to search for the desired command or function in the left column. Another common result is the Viva Clipper wordpress site. The good news is that you get right to the exact command or function you want. The bad news is that these are basically Unix man pages without examples, and we all know that man pages contain enough ambiguities that examples become necessary to avoid the need for trial and error experimentation.
There are some tutorials, and these are a great resource for learning, but they're a bad resource for finding answers to specific questions.
This document is written specifically to get you past the Harbour oddities, after which Harbour becomes an extremely productive language. Also, armed with the info in this document, you can ask questions on the Harbour mailing list without looking helpless.
CLI, GUI and Web Interfaces
Interactive computer programs can interface with the user through CLI (Command Line Interface), GUI (Graphical User Interface), and Web (using a browser to access the computer program). Harbour language is an implementation of the old Clipper computer language. Clipper was written to use CLI, so that's what's easiest with Harbour. Harbour has add-ons enabling it to do GUI and Web, but if you're interested in the quickest possible program authoring, Harbour language with a CLI interface is one of the quickest development envrionments you'll find today, with any language.
There are two types of CLI: Standard and Direct Placement. Standard is what's been around forever. Writing continues from the current cursor position and as new lines are written, the older writing scrolls upward and eventually off the screen. Whenever the user types something, that typing is inserted at the current cursor position.
Note:
Actually, Harbour inserts a newline after the current cursor position, and doesn't insert a newline upon program end, but this is a minor point.
Direct Placement is different in that computer output is placed wherever on the screen the program dictates it be placed, and info typed by the user goes wherever the program directs, so that the screen appears as several input fields with prompts. Screenshots of each follow:

Standard CLI

Direct Placement CLI
You Must Use the Proper Terminal Driver For Your CLI Type
Harbour uses what they call Graphical Terminal Drivers, even for CLI. These are often called GT drivers for short. GT drivers are declared in the hbmk2 command. In general you use the gtcli driver for Standard CLI on Linux, and use the gttrm driver for Direct Placement CLI on Linux. The hbmk2 commands for each follow:
hbmk2 -gtcgi my_standard_cli.prg
hbmk2 -gttrm my_direct_placement_cli.prg
In general, on Linux, you should use one or the other driver, but not both. If you use both, sometimes problems crop up. If you use neither, Direct Placement CLI doesn't work at all, and Standard CLI cannot display bright backgrounds.
Rapid Application Development
RAD stands for "Rapid Application Development", which was a major goal of many programming languages in the 1980's. These created CLI (Command Line Interface) programs something like an nCurses program of today, but they were incredibly faster to develop. The all time champion RAD language was Clarion 2.x, which a person with a month or two of Clarion experience could complete a practical and useful four table CRUD (Create Read Update Delete) application in a day. Don't try that with RAILS or whatever the latest Javascript extension is today.
The first RAD language to gain widespread adoption was DBASE. DBASE had built in (non SQL) databases built in. Laying out input screens was trivial. Reports were trivial. As far as number and string manipulation, it could do pretty much what any language could do, and sometimes it could do these things with less challenge to the developer. But large DBASE programs were slow pigs, so soon enough more capable workalikes were created. One was Foxbase, which later became Foxpro. Another was called Clipper.
Unlike DBASE, Clipper was a compiled language that ran extremely fast. And it was an extremely capable language. I once saw a Clipper developer write a very complicated datacomm application without xon/xoff in a day, after it had taken me two weeks to do the same thing in C. OK, the other guy was more skilled than I, but not that much more skilled.
Large businesses began switching from MS-DOS to Windows 3.0 in late 1990. By 1994, GUI (Graphical User Interface) programs were replacing CLI programs right and left. Clipper was left behind in the rush, except for free lance developers making vertical market applications. Even in the early 21st Century you could still walk into a Video Store (remember those) or a gas station or maybe even a dentist's office and see a CLI program running their business, but as time went on it became rarer and rarer.
Clipper was so good at what it did that in the Free Software community there was a huge demand for a Free Software Clipper workalike, so in 1999 Antonio Linares founded the Harbour project and made the first Harbour compiler. Over the years it got better and better, and over the years it acquired modern features like object orientation and add-ons for web applications and GUI applications.
This Document Assumes Linux
My computer has a Linux operating system. This document's guidance and examples are valid for Linux. If you use a different operating system, there will be some differences, but this document will still be very informative.
Harbour Keywords Are Case Insensitive
Harbour keywords are case insensitive, so they can be typed in upper case, lower case, or mixed case and still produce the same results. Most Harbour documentation uses some or all upper case letters in keywords. The Steve Litt's Harbour Handbook subsite varies from this custom because Harbour is meant for quick development, and constantly toggling caps-lock slows you down.
Installation
This section isn't written yet. For now, go to to https://www.kresin.ru/en/hrbfaq.html#Install for some installation guidelines.
Harbour Hello World
Once you've installed Harbour, create the following hello.prg file:
? "Hello World!"
Next, run the following command and observe the output:
    [slitt@mydesk harbour]$ harbour hello.prg -gh
    Harbour 3.2.0dev (r2104281802)
    Copyright (c) 1999-2021, https://harbour.github.io/
    Compiling 'hello.prg'...
    Lines 2, Functions/Procedures 1
    Generating Harbour Portable Object output to 'hello.hrb'... Done.
    [slitt@mydesk harbour]$
The preceding command should have no errors or warnings. If it has errors or warnings, troubleshoot. The preceding command creates a tiny p-code file, called hello.hrb which can be run with the hbrun command:
hbrun hello.hrb
The preceding should yield the string "Hello World!" in gray letters on a black background, immediately after the current cursor position. If not, troubleshoot.
Showcasing the ? "mystring" statement:
The ? "mystring" statement prints string "mystring" to the terminal at the current cursor position, and then linefeeds. So it acts like print() in Python, writeln() in Pascal, and printf("mystring\n") in C.
The harbor and hbrun method is necessary when your computer doesn't have a Harbour compatible C compiler. The GCC compiler on Linux is compatible.
I recommend that instead of using the harbour and hbrun method, you install a Harbour compatible C compiler so you can compile all the way to native binary. On my setup, the native binary is slightly over 21KB in size, so it loads fast, runs fast, and takes up little disk space. The rest of the Steve Litt's Harbour Handbook subsite discusses only the complete compilation to binary.
Compiling to Native Binary
Using the same hello.prg, perform the following:
[slitt@mydesk harbour]$ hbmk2 hello.prg
Harbour 3.2.0dev (r2104281802)
Copyright (c) 1999-2021, https://harbour.github.io/
Compiling 'hello.prg'...
Lines 2, Functions/Procedures 1
Generating C source output to '/tmp/hbmk_reolib.dir/hello.c'... Done.
[slitt@mydesk harbour]$
As long as you have a suitable C compiler on your system, the preceding should not have errors or warnings. If it does, troubleshoot. If you don't have a suitable C compiler, you must either install one or use the harbour and hbrun method.
Finally, run the program you just compiled, which hbmk2 named hello by default. Once again, the program prints "Hello World!" on the line following the line on which you typed the ./hello command.
Once you've compiled and run hello.prg, you know your installation is pretty much OK and you have a foundation to build on.
Hello World With Positioning
A spectacular feature of Harbour in CLI (Command Line Interface) programming is the ability to specify the line and column text goes on. This makes laying out input and informational screens trivial. A simple and slight change to the previous Hello World program (call this one hello_position.prg) demonstrates this by printing on the fifth line starting in the tenth column:
CLS
@4, 9 say "Hello World!"
Compile and run the preceding program (I call it hello_position.prg, and observe that the "Hello World!"
string starts printing in the tenth column of the fifth line of the screen.
Showcasing the @ rowvar,colvar say stringvar statement:
The @ rowvar,colvar say stringvar statement enables you to declare the CLI screen row and column at which you start displaying the string. This makes CLI input form design trivial. In Linux, if you're tempted to use the nCurses library, consider using Harbour instead.
Comments in Harbour
In my opinion, by far the most convenient method of commenting is to use two consecutive forward slashes, which render the remainder of the line a comment. The double slash may be followed by one or more spaces, but this is not a necessity. See the tiny following program, which compiles and does the expected.
? "This is real code" // this is a comment
? "Bye bye."
//This is a whole line comment
? ""
For multiline comments, surround your multiline comment with /* and */, just like in C.
For single line comments, you can use an asterisk before printable characters on the line, but the asterisk doesn't compile if you try to use it within the printed text. You can use the note command instead of the asterisk, but doing so is a bad idea because it's an English word that shows up often in comments.
Enabling Bright/Light Background Colors
To be readable readable by all people with vision, text must contrast greatly with its background. I mean really, who would want to read like this? Yeah, you can read the preceding sentence's purple on blue if you have 20/20 vision and are not color blind, but even so, the strain of reading it probably slows you down 10%. For those who can't read it, drag your mouse over it to see it. Don't do this to the people who use your software.
To implement contrast, you need either a very bright foreground on a very dark background, or a very dark foreground on a very bright background. And sometimes, even if you do the former, parts of the screen must be the opposite. Input fields, for instance. So it's important to be able to display bright backgrounds.
Because DBASE and Clipper, Harbour's grandparent and parent respectively, were born when MS-DOS and CPM were the ruling operating systems, and most monitors could reproduce only 2 or 8 colors, and people actually considered blinking text to be an acceptable thing, you must jump through some easy hoops to achieve a white background:
- In Linux, perform all of the following three actions:
- In your Harbour code, set
setblink(.t.) - While compiling with
hbmk2, add thegttrmfacility, as inhbmk2 myprogram.prg -gttrm. - Specify colors by color number (e.g.
"0/15"for black on bright white, not by letter designation e.g."n/W*"), which is an inferior way to specify black on bright white.
- In your Harbour code, set
- In Windows:
- In your Harbour code, set
setblink(.f.)
- In your Harbour code, set
Note:
Regardless of operating system, in Harbour you'll have a much easier life if you specify colors by by color number (e.g. "0/15" for black on bright white, not by letter designation (e.g. "n/W*", which is an inferior way to specify black on bright white.
Introduction to Arrays
This section merely scratches the surface of arrays. Only facts needed later in this document are included in this section.
Observe the following program, which prints array arr, one element at a time:
arr := {"a", "b", "c"}
? arr
? ""

local ss := 0
arr = {"a", "b", "c"}
for ss := 1 to len(arr)
  ? "Element", transform(ss, "9"), "is", arr[ss]
next
? ""
LANDMINE ALERT:
Unlike most other computer languages, Harbour declares arrays with curly braces ({) and (}), not square brackets. If you use square brackets, some things work, but others don't. The correct way to declare an array is with curly braces. However, Harbour identifies specific array elements using square brackets. So use curly braces to declare an array, and square brackets to refer to specific elements.
Showcasing the transform() function
The transform() function is used to format strings and numbers. The first argument is the expression yielding what you want formatted. The second argument is a format string. Each digit is represented by "9". There are many more possibilities for the format string. For a complete description see https://www.itlnet.net/programming/program/Reference/c53g01c/nga46c2.html.
You can also declare an empty array, plus you can append to any array with the aadd() function, both of which are shown in the following code:
local ss := 0
arr = {}
aadd(arr, "one")
aadd(arr, "two")
aadd(arr, "three")
for ss := 1 to len(arr)
    ? "Element", transform(ss, "9"), "is", arr[ss]
next
? ""
If you want to insert an array element at a particular array position, you can use the ains() function, which is very tricky because it removes the last element in the array, so if you don't want that element removed you need to use aadd(myarray,"whatever") before using ains(myarray,2). ains() is also very tricky with multidimensional arrays, which aren't discussed in this section.
If you need to run specific code on every element of an array, you can use the aeval() procedure, as follows:
procedure showw(arg)
  ? arg
return

procedure main()
  local ss := 0
  arr = {10,20,30}
  aeval(arr, {| elm | showw(elm * 2)})
  ? ""
return
As you can imagine, the preceding code prints out twice the value of each array element. aeval is slick and it's cool but I'll say nothing more about it because it's confusing, tricky and fragile, and as far as I'm concerned the main reason for using it to confuse the developer looking at your code into thinking you're smart. Do yourself and the world a favor and use for or for each or do while instead of aeval() when iterating arrays.
Procedures and Functions
Procedures and functions are pretty much the same in Harbour as they are in Pascal: A function returns a value, a procedure doesn't. If you're more familiar with C or Python, you can think of a procedure as a function that doesn't return a value. The following code demonstrates a procedure:
write_it()

procedure write_it()
    ? "This is being written by procedure write_it()"
    ? ""
return
The preceding prints "This is being written by procedure write_it()" on the screen, with a newline courtesy of the question mark with the empty string. The \n that works so well in C doesn't create a newline in Harbour.
Notice also that the return statement ends the procedure. In this way Harbour procedures and functions differ from C and Pascal, because C functions and Pascal procedures and functions operate on a single block defined with curly braces (in C and Ruby) and begin and end (in Pascal), whereas in Harbour the return belongs to the procedure() or function() statement.
Notice also that the call to write_it() is at the top, not at the bottom like you'd expect with most languages. This is explained later in this section.
The following code demonstrates a function:
? "Now printing", return_it()
? ""

function return_it()
    local st := "String returned from return_it()"
return st
The preceding prints "Now printing String returned from return_it()". This time the return statement names the variable to be returned. Once again, the call comes at the top, which is explained later in this section.
Arguments are simple enough:
writeline("This is a string")

procedure writeline(mystring)
    ? mystring
    ? ""
return
The preceding code printed the argument plus a newline.
Execution Order
Now we get to the promised discussion of why the procedure and function calls went on top. It's because of the unique order in which a Harbour program executes, trying the following three strategies, in order:
- Search for a procedure or function called "main", and if there is one, execute it. When
main()exits, the program exits. - If there's no
main(), start at the top and execute statements serially. If any statement calls a procedure or function in the program, execute that procedure or function. When that procedure or function exits, the program exits. - If there are no calls to a procedure or function encountered before hitting the definition of a procedure or function, execute the topmost defined procedure or function. When that procedure or function exits, the program exits.
The preceding three strategies are why I put the function and procedure calls at the top in previous examples. If I'd put them at the bottom, they never would have been encountered. Of course, they weren't needed unless I wanted to execute a procedure or function that came below another procedure or function or return statement.
Did the preceding paragraph confuse you? It didn't confuse you half as much as I was confused before I figured out the facts in the preceding three stage strategy and paragraph. When I first looked at it, it seemed a confusing mess.
By far the least confusing way to write Harbour code is to always have a main() procedure, put it either at the top or bottom to make it obvious, and do not put a call to it in the program. Have that main() procedure call everything else needing to be called, with no code existing outside of procedures and functions. This includes global variables: Declare those within main().
You might wonder whether you should use a main() function when command line arguments need to be handled. Well, that's one way, as long as you jump through the right hoops. But the next section of this document introduces the hb_aParams() method of command line handling, which is much more reliable in all coding situations.
For the rest of this document and the rest of the Harbour Intro subsite, all code samples will have a main() procedure.
Handling Command Line Arguments In Harbour
An essential part of any language is the ability to handle command line arguments. Unfortunately, Internet Harbour and Clipper documents contain more nonworking command line argument code than working. And as for the working techniques, a lot depend on global variables or exact placement of code snippets in the program. They work if you copy and paste them verbatim, but they fail as you start adding other code to your program. This section presents a non-fragile Harbour command line handling technique that works all the time. The code follows:
procedure main()
local ss
public argv := hb_aparams()
public argc := len(argv)

? "Basename of this program is", argv[1]

for ss := 2 to argc
    ? argv[ss]
next
? ""
return
The preceding code lists all the program's command line arguments, with the first argument (subscript 1) being the name of the program.
Showcasing hb_aparams()
hb_aparams() returns an array of all the program's command line arguments, including the base program name (without the directory path). The array's length is the number of arguments including the program base name. In the array, element 1 is the program base name.
Running External Programs From Harbour
To run an external program from Harbour, simply use the run command, as shown in the following code:
? "Entering Harbour."
? ""
run libreoffice
? "Exiting Harbour."
? ""
The preceding program prints "Entering Harbour.", then runs the libreoffice program, then waits until you close the libreoffice program, at which time it prints "Exiting Harbour." and terminates.
Note:
You needn't surround the arguments for the run command with quotes, and in fact doing so often prevents proper functioning.
The following example showcases a much more complex set of command line arguments:
? "Entering Harbour."
? ""
run ls
? "Exiting Harbour."
? ""
The preceding code prints "Entering Harbour.", then runs the ls command, then immediately prints "Exiting Harbour." and terminates. Technically it waits for the ls command to terminate, but that termination occurs so quickly as to be imperceptible. Now consider the following code:
? "Entering Harbour"
? ""
run ls -1 | cat -n | grep \.prg$ | xargs -n2 echo "File: "
? "Exiting Harbour"
? ""
The preceding code lists all files in the current directory, then puts line numbers on each, then filters out all that do not end in ".prg", then prepends "File: " to each line number/filename pair.
Note:
Notice the quotes around File: . This is to accommodate the Bourne or Bash shell. The Bourne and Bash shells are tricky, so you might need to do some experimentation with quotes and backslashes to get things to work the way you hoped.
A Time Saving Compile/Run Script
Up to this point we've done compile and run as separate operations. This can get very tedious, so this section introduces a Linux shellscript to delete the old executable, compile a new one, and run it. The shellscript is kept in the current directory and is called jj because that's incredibly easy to type. If you need multiple compile shellscripts in the same directory you can name them kk, hh, ff, dd, gg, etc. Obviously you permission them executable by at least you (I permission them executable by all). The following is my generic compile shellscript, called jj:
#!/bin/sh
clear  # Reset terminal to normal

# Prevent accidental erasure of .prg
if echo $1 | grep "\."; then
    echo Cannot have a dot in the program name.
    echo aborting...
    exit 1
fi
echo $1

# Remove old executable so
# blown compiles are recognized
rm $1

hbmk2 $1.prg -gttrm   # Compile the .prg

# Wait for user to read messages
echo Hit Enter after reading
read

./$1  # Run the newly compiled program
Therefore, to compile a program called hellomenu.prg, issue the following command from the Linux command prompt:
./jj hellomenu
As you continue modifying and testing your file, simply use the uparrow on your keyboard to rerun the command. Quick and easy.
But What About Windows?
Windows is beyond the scope of Troubleshooters.Com's Steve Litt's Harbour Handbook Subsite, but you can achieve the same thing in Windows using Powershell.
Why Not Use a Make File?
Make files can save huge amounts of time compiling multi-file programs in the event that only one or a few files have been changed. This was especially true in ancient times, when a $50,000 ($200,000 in today's money) PDP-11 had less computing power than today's smartphones, and therefore could easily take an hour to compile a moderately sized program depending on several files. Harbour can certainly use make files to great advantage, if there's an advantage to be had.
Compiling and starting to compile a run the tiny programs in this document takes one or two tenths of a second. Faster than you can press the Enter key. Faster than you can read one line of the program. So you needn't bother with a make file, which, after all, could have bugs. Not only that, but even in the best of circumstances, make files occasionally don't recognize that a file's been changed, yielding very hard to troubleshoot problems (the equivalent of replacing your car's alternator with a "known good" alternator that's really bad). If there's nothing to be gained by partial compiles, why not compile and link every dependent file so that you can't fall victim to this type of problem?
A Program To Display a Color Chart
As mentioned in the Enabling Bright/Light Background Colors, your life in Harbour is much simpler if you display colors by number. The challenge is that you'll need a color chart. This section gives you Harbour code to print a Harbour 16 color color chart to your monitor. The code has a procedure called init_screen() that automatically to detect the operating system, and if Linux, set the program to conform to the needs of Harbour on Linux. Because this is a direct position CLI program, remember that in Linux you must compile with the -gttrm flag. The code for the color chart follows:
procedure init_screen()
osstring = upper(os())
if "LINUX" $ osstring
    setblink(.t.)
else
    setblink(.f.)
endif


procedure main()
local colorstring := ""
init_screen()
setcolor("0/15")
cls
for ncolor := 0 to 15
    if ncolor < 10
        colorstring := "15" + "/" + str(ncolor)
    else
        colorstring := "0" + "/" + str(ncolor)
    endif
    setcolor(colorstring)
    ? str(ncolor) + ": " + space(20) + os()
    setcolor("0/15")
    ? " "
next
return

main()
Showcasing mysubstring $ mywholestring
The mysubstring $ mywholestring operation tells whether or not string mysubstring is contained in mywholestring. The operation is case sensitive, so if you need to go case insensitive, use the upper() function on mywholestring, and if mysubstring is a variable, use upper() on that too.
Hello World With Colors
Nobody in their right mind would have a gray writing on a black background. This would be terribly disrespectful to people with less than 20/20 vision or people with monochrome vision. This section creates the same Hello World program, but with black writing on a bright white background. Create the following hello_colors.prg file:
setblink(.t.)
setcolor("0/15")
CLS
@0,0 say "Hello World!"
In Linux you must also compile with the -gttrm flag. In Windows, you must specify setblink(.f.).
Showcasing .t., .f., .and., .or. and .not.
In Harbour, .t. means "true", .f. means false, .and. is a logical "and", .or. is a logical "or", and .not. is a logical negation. These are not strings, but instead are Harbour logical operators, so you never put them in quotes. Harbour has several other logical operators that are easy to find in a web search or Harbour project documentation.
The following is an example:
if mylang == "harbour" .and. myos == "linux"
  HarbourOnLinux := .t.
endif
Showcasing =, :=, ==:
In Harbour, you can use = for both assignment and testing for equality, but in my opinion it's almost always much better to use := for assignment, and == to test for equality. There are a few edge cases in which you need = to test for equality or assign, but I'd advise you to cross that bridge if and when you come to it.
Adding An Input Field
In my opinion, Harbour's greatest benefits are lightning quick input screen layout and an easy built-in database facility. When it comes to input screen layout, you need input fields. For this, you use the get subcommand, which is appended to a say command.
When adding an input field, you need to jump through a few more hoops, but just a few more. Consider the following program, called hello_with_input.prg:
local mytext := space(10)
setcolor("RG+/B, W+/G")
CLS
@0,0 say "Input number:" get mytext
read
@4,1 say mytext
When compiled and run, the preceding program prompts for variable mytext in a field with white foreground and green background. This field contrasts well with the bright yellow on dark blue of the rest of the screen. After a variable is input and the When key is pressed, it writes the mytext starting in the second column of the fifth line.
Showcasing the get subcommand:
The get subcommand is appended to a say command, so that the say supplies the prompt for the get subcommand. The first argument to the get subcommand must be an already declared in-scope variable. If for some reason you don't want a prompt and want the field to start in column 0 of line 0, this would be done in one of the two following ways:
@0,-1 say "" get mytext
or
@0,0 get mytext
The get subcommand comes with a collection of optional arguments to specify the format, validity, color, code to execute on field exit, placing a field-specific message on the status bar, and several other capabilities.
If all those capabilities make the line too long, you can put a semicolon after the say part to continue the command, so you can put the get part on the next line. This is counterintuitive to experienced C, C++, Perl, and Ruby developers, because those languages use the semicolon to separate, not to continue.
Showcasing the CLS command:
In order for the @myline,myrow say "mystring" command to properly place and color output, the CLS command must be used toward the beginning of the program.
Harbour Menus
A great top level of application user interface is the menu. You pick an item, and the corresponding process or sub-application is run.
The following code creates a three item menu which, when you select one of the items, adds 3 to the item number, displaying this result in a text sentence using three @ say statements:
procedure main()
  local menuindex           // Menu selection index
  setcolor("14/1, 9/15")
  CLS
  @4,4 prompt "four"        // Menu selection 1
  @5,4 prompt "five"        // Menu selection 2
  @6,4 prompt "six"         // Menu selection 3
  menu to menuindex         // Run the menu
  @8,0 say "You chose "
  @8,10 say menuindex + 3 picture "9"
  @8,11 say "!"
  ? " "
return
Note that processing stops at the menu to menuindex line so the user can select the desired menu item, and then after the selection, it prints the result.
Showcasing the menu command
The menu command creates a menu from earlier prompt statements. The menuindex variable is a declared local variable to receive the number of the item chosen, with number 1 representing the top menu item. If the user escapes the menu by pressing the Esc key, menuindex contains 0. menuindex is not a reserved word: It's an in-scope variable that can have any name you want.
Showcasing the prompt command
The prompt command declares the text of a menu item, and declares the item to be a menu item of the next encountered menu statement. The prompt command can take an additional argument, a message, which is discussed in the next subsection.
Creating a horizontal menu
Observe the following horizontal menu screenshot, noticing that the third line contains a message about the highlighted menu item, and the fifth line contains the number of the item selected:
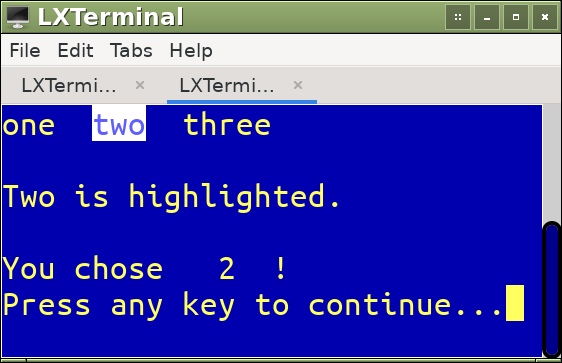
Sometimes horizontal menus make better use of scarce screen real state, especially when each menu item can be expressed in a very short string. The downside of such horizontal menus is that the short strings aren't helpful to brand new people just learning how to use your software. This is why you can declare a message area and have message strings associated with each prompt statement. The following is the code for a horizontal menu:
procedure main()
  local menuindex
  setcolor("14/1, 9/15")
  CLS
  set message to 2                 // Set message line to 2
  @0,0 prompt "one"                message "One is highlighted."
  @ row(),col() + 2 prompt "two"   message "Two is highlighted."
  @ row(),col() + 2 prompt "three" message "Three is highlighted."
  menu to menuindex
  @4,0 say "You chose "
  @row(),col() + 2 say menuindex picture "9"
  @row(),col() + 2 say "!"
  wait
  ? " "
return
The set message to 2 line declares that line 2 of the screen (with line 0 being the top line) is where messages are put. The message part of each prompt statement declares what that message should be if the user highlights the choice. The wait statement stops execution so you can see the result of the user's choice.
Showcasing row() and col() functions:
The row() and col() functions deliver the row and column numbers, respectively, of the next character to be written. If one or both have no argument, it means the current horizontal or vertical or both position. This is very handy for @ say and @ prompt statements.
Trivial Database Example
Although most modern people associate the word "database" with a relational database controlled via SQL, the term is actually much more broad than that. There were ancient hierchical databases such as Focus' built in database, and modern hierarchical databases such as YAML, JSON, and MongoDB. From the dawn of time the Cobol language had a built in database that was essentially several Indexed Sequential Access Method (ISAM) files, one for each (what would later be known as a) table. Later the VMS operating system and the Btrieve utility implemented ISAM files. With ISAM, there was no SQL command to access joins and the like, you just retrieved from the file with the foreign key, and for each retrieved record you then retrieved from the "table" whose primary key matched the foreign key. Access was kept fast by on-disk indexes.
Like Cobol, VMS, and Btrieve, the DBASE language, grandfather of Harbour, implemented built in ISAM files to create a database. Harbour retains this capability, and it's probably the easiest way to database for a lot of people. Remember, the less trivial an SQL statement gets, the exponentially harder it becomes to implement accurately and efficiently. Harbour can also use modern, SQL driven relational databases, but this example uses their ISAM files. DBASE, Clipper and Harbour all used DBF files to accomplish this.
This section focuses on the following:
- Creating a DBF File
- Browse the New Empty Data File
- Adding Data to a DBF File
- Browse the Filled Data File
- Iterating through the Data File
Creating a DBF File
The first step is to create the DBF file. There's no Harbour utility to do this, so unless you want to pay for such a utility, you create the DBF file using a Harbour program. Let's say you want to create a DBF file with three columns (fields): name, age and networth. The following is the code to create DBF file mydbf.dbf in the current directory:
LOCAL mydbstructure := { ;
   { "name",        "C", 25, 0 },;
   { "age",         "N",  8, 0},;
   { "networth",    "N",  17, 2};
}
//request dbfcdx
request dbfntx
dbcreate("mydbf", mydbstructure, "dbfntx", nil, "mydbf")
In the preceding code, the data structure is defined in mydbstructure, the dbfntx database driver is used, and the dbfcreate() does the actual work. The arguments to dbfcreate() are as follows:
"mydbf": Name of the new DBF file to be created. If no extension is given, the default is.dbf. If no directory is given, the default is the current directory. Landmines apply, as discussed after this list.mydbstructure: Multidimensional array containing the file's "table structure"."dbfntx": Name of the database driver to use.dbfntxis a native Harbour driver. There are plenty others that work..t.:.t.means open the file in a new area..f.means open the file in the current area.nilmeans don't open the file at all."mydbf": Alias for this file holding a table.
LANDMINE ALERT:
On my setup with Harbour version 3.2.0dev on Void Linux, dbcreate() throws a Create Error when the first argument, the filename, explicitly expresses the current directory. In other words, if the current directory is /d/at/harborcode, the following throw a Create Error:
/d/at/harbourcode/mydbf.dbf/d/at/harbourcode/mydbf.dog/d/at/harbourcode/mydbf/d/at/harbourcode/mydbf.dbf/d/at/harbourcode/mydbf.dbf/d/at/harbourcode/mydbf.dbf
And the following, none of which specifically declare the current directory, do not throw an error:
mydbf.dogmydbf.dbf/tmp/mydbf/tmp/mydbf.dbf/tmp/mydbf.dog
Bottom line: If you want to create the DBF file in the current directory, do not prepend a path to the filename in the first argument to dbcreate().
Browse the New Empty Data File
This subsection walks you through a program to browse the new, empty data file called mydbf.dbf in order to prove that the file has been created and has the right fields (columns). Because you don't want to actually change the data file at this time, after looking and making sure the right fields are there, press the Esc (Escape) key to exit the program without altering the data file.
Run the following program to browse the new, empty data file, and press the Esc key after observing the screen:
setcolor("14/1, 9/15")
cls
dbusearea(.t.,,"mydbf.dbf")
browse()
pack
mydbf->(dbCloseArea())
Note:
The pack command isn't strictly necessary when using browse() just to look and not touch, but it's necessary to actually remove any records (rows) you've deleted.
The preceding code brings up a dark blue screen with yellow lettering and white input fields with blue lettering. This screen has one record (row), an empty one that you can fill. But in this case, just press the keyboard Esc (Escape) key to exit without saving.
Adding Data to a DBF File
Now that your DBF file is created, the next step is to add some data. This subsection adds via a script doing five dbappend() operations. Remember, the structure of the DBF file created in the preceding subsection was name, age and networth, with name being a string, and the other two being numbers. The script creates five records. Each new record requires first a call to dbappend() to create a new, empty record, and then for each field calls to assign values to each field (row). So it's very simple, although it's done five times for the five people being input. The script follows:
dbusearea(,,"mydbf")
mydbf->(dbappend())
mydbf->name := "Andrea Anderson"
mydbf->age := 34
mydbf->networth := 9876543210

mydbf->(dbappend())
mydbf->name := "Brett Billings"
mydbf->age := 90
mydbf->networth := 54321

mydbf->(dbappend())
mydbf->name := "Cindy Cortez"
mydbf->age := 34
mydbf->networth := -30000

mydbf->(dbappend())
mydbf->name := "Darian Diaz"
mydbf->age := 80
mydbf->networth := 654321

mydbf->(dbappend())
mydbf->name := "Elizabeth Ellison"
mydbf->age := 80
mydbf->networth := 54321

mydbf->(dbCloseArea())
You can see the results by running the browse program. Read on...
Browse the Filled Data File
Run the same data browser program as before on the same file:
setcolor("14/1, 9/15")
cls
dbusearea(.t.,,"mydbf.dbf")
browse()
pack
mydbf->(dbCloseArea())
Running the preceding code enables you to see the records you added. The browse command bestows the following keystrokes:
| Hotkey | Action |
| Up arrow | Up one row |
| Down arrow | Down one row |
| Left arrow | Column left |
| Right arrow | Column right |
| Ctrl+Left arrow | Pan left one column |
| Ctrl+Right arrow | Pan right one column |
| Home | Leftmost current screen column |
| End | Rightmost current screen column |
| Ctrl+Home | Leftmost column |
| Ctrl+End | Rightmost column |
| PgUp | Previous screen |
| PgDn | Next screen |
| Ctrl+PgUp | First row of current column |
| Ctrl+PgDn | Last row of current column |
| Esc | Terminate and save BROWSE |
Important:
There may come times when the preceding hotkeys don't work as advertised. When this happens, press the Enter key on the keyboard one or more times to get back into the proper state.
At this point, take some time within the data browser to add, delete and modify data. As far as I know the Harbour browse command has no provision to back out changes, but that's OK in this situation because you can always re-run the previously described programs to create the data file and fill it with five records.
Harbour's browse command isn't the right way for data to be added, deleted and modified in a finished piece of software, but it sure is nice to have this three minute tool so the software can be used while fundamental development is still happening.
Iterating through the Data File
This subsection walks you through an incredibly simple program to iterate the DBF file in the orders in which the records were added to the DBF file. Assuming after your data browsing activities you still have some records in your DBF file, create and run the following code:
dbusearea(,,"mydbf")
locate
do while found()
  ? name, networth, age
  skip
  locate rest
enddo
mydbf->(dbclosearea())
The first locate command locates the first record (in the order records were entered). found() tells whether the previous locate was successful, and if so, the program prints the record, skips to the next record, and does another locate. I don't know the exact mechanics, but if you don't include both the skip and the rest, it will infinitely loop on the first record.
We've Just Scratched the Surface
In this section we've created an empty DBF file, we've loaded it with a Harbour program, we've used a tiny Harbour program that uses the browse command to look at and edit the data, and we've created a program to read the DBF file's data, in the order it occurs in the DBF. We've created, added, edited, and read. It's left as reader exercise to write a Harbour program to delete the first record: Just remember to call the pack command near the end of the program, or the deletion will be marked but not completed.
The preceding paragraph not withstanding, we've just scratched the surface of Harbour data handling. Activities we haven't investigated include creating selection lists, performing any kind of join whether static or programatic, indexed access which is essential for good performance on medium and large data sets, sorting, primary and foreign keys, and input forms that are truly cancelable, just to name a few. Documents written later might cover some of these things.
Getting Harbour Info
There are several places to get info on Harbour. The following are a few:
- Great explanation about functions affecting arrays and command line arguments
- Understanding Harbour GT: A listing and explanation of the various GT (Graphic Terminal) drivers. GT drivers are used even on Command Line Interfaces (CLI).
- Run the command
hbmk2 -find * | lessto see all the functions available to you. You should skim/scan/browse through this occasionally to get an idea of Harbour's capabilities. - Harbour Language Programming: Somewhat difficult to navigate, but this is the root of the Harbour knowledge tree.
- Harbour Reference Guide: Info about the Harbour/Clipper language nuts and bolts. You should skim/scan/browse through this occasionally to get an idea of Harbour's capabilities.
Where to Go From Here
As time goes on, more documents will be added to Steve Litt's Harbour Handbook. Also, keep looking at the URLs listed in the preceding section, and use web searches and mailing lists too.