Troubleshooters.Com  and

Steve Litt's Pool Resurrection Page Present

Cleaning a DE Filter

Copyright (C) 2005, 2008 by Steve Litt

See the Troubleshooters.Com Bookstore.

CONTENTS:

DISCLAIMER

The information in this document is information is presented "as is",  without warranty of any kind, either expressed or implied, including, but not limited to, the implied warranties of merchantability and fitness for a particular purpose. The entire risk as to the quality and performance of the information is with you. Should this information prove defective, you assume the cost of all necessary servicing, repair, legal costs, negotiations with insurance companies or others, correction or medical care.

Note that filters operate under high pressures, so that mishaps can result in extensive propert damage, severe personal injury or death.

In no event unless required by applicable law or agreed to in writing will the copyright holder, authors, or any other party who may modify and/or redistribute the information, be liable to you for damages, including any general, special, incidental or consequential damages or personal injury arising out of the use or inability to use the information, even if such holder or other party has been advised of the possibility of such damages.

If this is not acceptable to you, you may not read this information.


Introduction

DE filters are great. They filter down to something like 3 microns. You needn't buy cartridges for them. If you keep your pool clean they're pretty low maintenance, requiring backflushing and reloading of the DE or Fiberclear powder every month or so.

But at least once a year, and probably more often unless you keep your pool absolutely immaculate, you need your entire filter assembly, including the grids, cleaned. I've had to have mine cleaned twice in about 6 months.

The cleaning costs $80.00 if a pool professional does it. So from now on I plan to do the cleaning myself. This web page represents my notes on filter cleaning.

90% of filter cleaning is simple manual labor. The other 10% requires some patience and manual dexterity, but it can be done.

Pool filter cleaning is not for the faint of heart. Done wrong, it can be very dangerous. If one forgets to depressurize the filter, parts can fly out at dangerous or even lethal speed. Also, if done wrong, it can damage very expensive parts.

But if done right, it can be done safely and save a few hundred dollars per year.

A Few Warnings

ALWAYS shut off the circuit breaker and completely bleed the system (via the pressure relief valve) before starting any kind of disassembly on the filter. As will be mentioned in this document, at 20PSI (a reasonable working pressure), an 18 inch diameter filter housing top has over 5000 pounds of force on it -- enough to lift a car. I have heard anecdotes of a filter top blowing off, high into the air, and landing in the neighbor's yard. This kind of power can break bones, cause brain damage, and kill.

ALWAYS check everything after reassembly before turning the circuit breaker back on. Try not to have any body parts above the filter while turning on the circuit breaker (and possibly the timer switch). Try to stay away from the filter the first few minutes after turning on the system. Once again, you want to avoid a situation where a part blows off and hits you.

If you see a filter housing leak, shut it down. If the leak appears to come from the seal between the housing top and bottom, you might try regreasing and reseating the gasket and tightening the belt, or maybe even replacing the gasket. If none of these things work, call in a pool professional. If the leak comes from an actual crack in the housing, the filter could explode, which could be injurious or fatal.

For all the reasons above, keep young children away from the filter when you're working on it. Tell your children not to try to disassemble the filter, and tell them why they shouldn't.

This should be obvious, but always conect a pool drainer hose (those blue plastic hoses) to the waste (to street) pipe off the multiport valve, and roll that hose out to the street or a driveway slanted toward the street. The volumes of water evacuated during backwash and rinse will make a mess, it could undermine your house's foundation, and the contained clorine would not be good for plants. Make sure the hose has no large holes, and that it's tightly secured to the waste pipe with a radiator clamp.

Always turn off the pump, and wait for it to spin down (maybe 5 seconds) before changing the setting of the multiport valve. If you were to try to switch the multiport valve while the pump was going, it would create a water hammer that would harm your multiport valve or other part of your pool system, and could even cause a pipe, filter, valve or other component to explode, which would be very dangerous.

Always be sure that your multiport valve is set on Filter before loading DE powder. If you accidentally reload DE powder when the multiport filter is in the Backwash position, the DE will jam the interior of the grids and possibly the pipes leading to it. Because the grid mesh is reinforced on the interior but not exterior, the grids could explode, requiring the purchase of expensive new grids. If you ever accidentally load DE with the multiport set at Backwash , shut it down, switch to rinse, and run in rinse mode until no more DE comes out the hose into the street.

Use common sense. There's no way I can list all the actions that would create damage, injury or death.

Anatomy of a DE Filter

A DE filter (or at least my Hayward DE 4820 DE Filter) consists of 8 grids packed into a fiberglass housing. The housing consists of a top and a bottom, held tightly together by a bolt tightened belt. The 8 grids are bolted together into an assembly, and the assembly is connected to the outflow pipe of the filter via a press fit PVC pipe.

The housing has four places where water can exit or enter:
  1. Supply pipe (bottom pipe) from the multiport valve.
  2. Return pipe (top pipe) from the multiport valve.
  3. Drain with plug on a "leg" at the very bottom of the filter
  4. The pressure relief valve at the very top of the filter.
All but the pressure relief valve penetrate the bottom part of the housing.

Anatomy of a Grid

At its very simplest, a grid can be thought of as a nylon stocking. It lets water pass, but does not pass DE powder (or Fiberclear). Now imagine the nylon stocking wrapped around a light plastic framework, maybe 30 inches high, 12 inches wide, and 2 inches deep. The 12 inch dimension is curved (maybe 20 inch radius) but you needn't worry about that just yet.

The important thing to remember is that the plastic framework prevents the stocking from collapsing. This is necessary because the pressure outside the stocking is higher than inside the stocking.


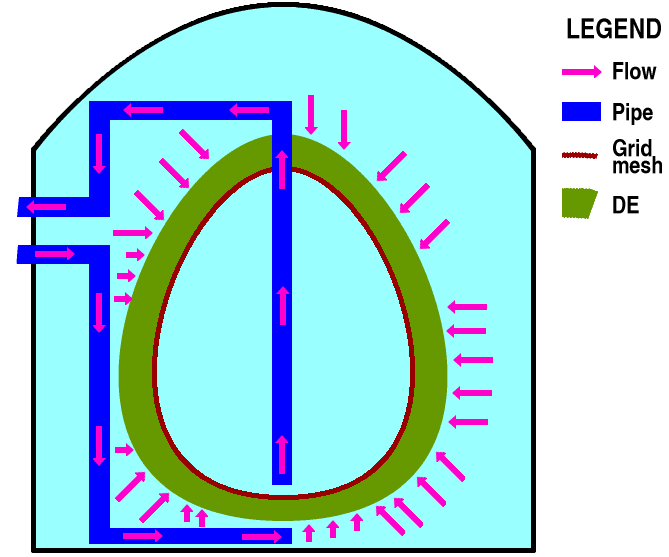
Model of a grid
   
A "Stocking model" of a grid. Here you see the water come in the filter supply pipe, go to the bottom of the housing, then push through the DE coated on the outside of the grid mesh. Once inside the grid mesh, the now purified water goes out the grid pipe and then out the filter return pipe.

Not shown is the grid framework that prevents the grid mesh from collapsing under pressure.


The water flows from outside the stocking to inside the stocking. DE powder surrounds the entire outside of the stocking so that water flowing through the stocking into its inside is filtered by that DE powder.

You might wonder where all the water that flows through the DE into the stocking goes. Once again thinking of a stocking, a PVC pipe is inserted into the leg hole and then sealed tightly, so water exits only through the PVC pipe. The PVC pipe sends the water back to the pool.

Now, getting rid of the stocking analogy, a grid is a plastic framework covered with a tough, fine mesh. A small PVC pipe passes from the top of the framework into the interior, to conduct out filtered water. In normal operation, the grid is surrounded by DE powder. Water is pumped into the filter housing at high pressure, it passes through the DE covered mesh, and then escapes back to the pool via the PVC pipe.

Photo of a grid
   
PHOTO of a Grid: This is a closeup of the technician cleaning one grid. He has cleaned the center, but the left and right sides have not yet been cleaned yet, so they are still coated with (dirty) DE. In the clean part, you can clearly see the fine white mesh that completely surrounds the grid. Below the translucent fine white mesh, you can see the plastic framework that holds the mesh in place and keeps it from collapsing inward under pressure.

At the bottom of the picture you see the pipe that lets water escape from the grid. The pipe opening is at the bottom, right at the border between the rightmost dirty area and the clean area.

In normal operation, the pipe opening is up instead of down. The pipe runs the length of the grid so that water (and other junk) from the bottom of the grid (which is at the top of this picture) can be pulled out of the grid.

In the picture, the technician's thumb is grasping the bottom of the pipe, while the pipe visible at the bottom of the picture is actually the top of the pipe.


You need to form a mental picture of a grid. When we talk about normal filtering operation, backwashing and rinsing, these operations will be explained partially in the context of water flow through the grids.

Once again, the purpose of each grid is to provide a mesh to be covered with DE powder. The mesh does not pass the DE powder, but it does pass water. The DE powder is what filters particles out of the water.

Remember again, flow through the grid is from outside to inside. The DE powder surrounds the outside of the grid.

Filtering Functions

The multiport valve that comes with my DE filter has six functions:
  1. Filter (normal operation)
  2. Backwash (filter cleaning, cleans outside of grids)
  3. Rinse (to clean the inside of the grids)
  4. Waste (direct from pool to street)
  5. Recirculate (maintain circulation, short circuiting the filter)
  6. Close (blocks all movement of water through the valve)
Numbers 1-3 send water through the filter, while numbers 4 and 5 send water around the filter. Number 6 shuts off all water flow, and would be terribly destructive if the pump were to come on while the valve was in the close position. My understanding is that the close position is used primarily to winterize a pool.

Filter mode
   
FILTER MODE: This is the normal mode of your filter system. Water comes form the pool, into the supply pipe of the filter, into the filter housing, through the DE and grid mesh, out the grid pipe and  return pipe and back to the pool.

Impurities get caught in the DE surrounding the grid, and are thus filtered out.


Rinse mode
   
RINSE MODE:  Flow is from pool to filter supply into the filter housing, through the DE and grid, out the filter return and then out to the street.

The purpose here is to get rid of any garbage caught inside the grids so that it doesn't go into your pool.

One way such garbage accumulates is during the backwashing process, when unfiltered water is sent to the interior of the grids.


Backwash mode
   
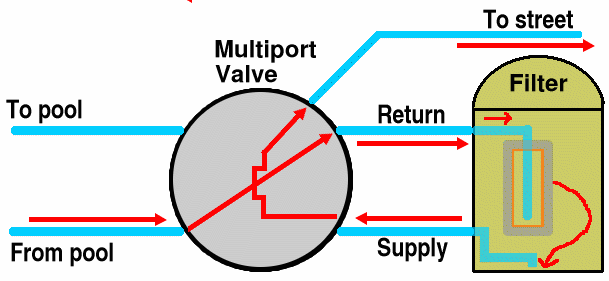
BACKWASH MODE: From the pool into the filter's return pipe, to the inside of the grids, through the DE (which should get blown away and drift toward the bottom, then out the supply pipe whose opening is at the bottom, and back out to the street.

This mode is specifically to send all the DE (which is presumably clogged with pool impurites it filtered out) into the street.


Waste mode
   
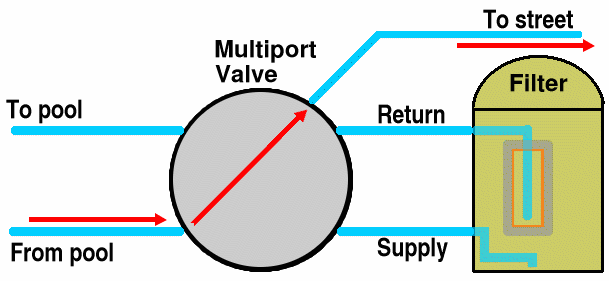
WASTE MODE: From the pool directly out to the street. The filter is not involved.

This is used to lower the level of your pool.


Recirculate mode
   
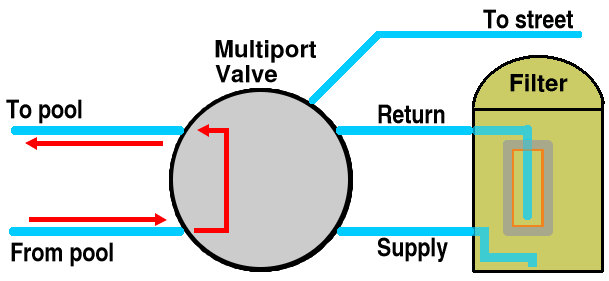
RECIRCULATE MODE: From the pool directly back to the pool. The filter is not involved.

Recirculate is used to provide circulation when you have a bad filter, or to provide circulation when your water is so algae infested that it would harm your filter. In both cases, Recirculate is a temporary measure, and the underlying problem should be fixed as fast as possible.


Close mode
   
CLOSE MODE: Blocks off all circulation. I don't know why it's used, but I hear it's used when you put a pool to bed for the winter.

NEVER turn on the pump while the valve is in close mode.

Click here to see a table of all the modes and their properties.


The various filter functions (or modes) are important to understand so you know when to do which, and also to understand the functioning of a filtration system.

Why Do DE Filters Need Cleaning?

NOTE
Throughout this article, whenever you read the word "DE", think of it as "DE or Fiberclear", unless it's used in a comparison to Fiberclear.

The purpose of backwashing is to blow out the old DE, with its trapped impurities, so you can replace it with clean DE. So why do you need to clean the DE filter? You won't know the answer to that question until you see a filter assembly that hasn't been cleaned for too long.

Here's the problem. As impurities cake DE, the combination of DE with those impurities makes a thick, muddy paste that doesn't just "wash out" when you backwash. Over time, especially with repeated cleanups of algae infestations, or even a single cleanup of a horrendous algae infestation, huge hunks of such thick, muddy paste clog the spaces between adjacent grids, and become thoroughly stuck, unable to be backwashed out.

One thing that I believe might further exacerbate the problem is excessively high filter pressure, which I believe would press this paste right into the mesh of the grid. Excessively high pressure occurs because of inattention -- the pool owner or maintainer doesn't regularly check the pressure, and so fails to backwash when the pressure goes to the specified amount, instead letting the pressure rise several PSI beyond that. The DE and impurities have been compressed into hard clumps and bonded to the grid mesh. They will not easily be backwashed out.

Once paste substantial clumps have formed, when you backwash and reload, the pressure goes down almost where it should, but quickly comes back up, even in a reasonably clear pool. This behavior costs a fortune in DE, and also prevents dead algae removal. Without efficient filtering, you can never have a really clear pool.

What has happened is the hunks of paste effectively eliminate grid square footage. When you backwash and reload, the reloaded DE is distributed on a reduced square footage, so you're really using too much DE, which makes things even less permeable and contributes to even more paste buildup.

Recognizing the Need for Cleaning

Like I said, as preventive maintenance dictates one or two annual filter cleanings. However, there may be times when cleaning is needed before preventive maintenance would otherwise indicate. Here are some symtoms that could indicate the need for a cleaning.

Too frequent need for backwashing

If, every time you brush your pool and loosen algae, the next day your pressure indicates yet another backwash, this indicates a need to clean the filter. Slight or even moderate clouding from a pool wall brushing shouldn't consume an entire load of DE on a filter that isn't clogged up with sludge.

Too high initial pressure

Immediately after cleaning the filter and loading DE, note and remember the pressure. It will likely be lower than post backwash/reload pressure before the cleaning. The lowest working pressure you'll ever observe is right after a filter cleaning.

Therefore, when post backwash/reload pressure becomes significantly higher than it was right after cleaning, that indicates the need to clean again. How much is significant? On my pool/pump/filter combination, 3 to 4 PSI is significant.

It's Not Linear

My pressure immediately after cleaning and reload is between 9 and 10PSI. As time goes on and sludge accumulates, that pressure right after backwashing and reloading goes up to 12, and then up to 14. Manufacturer's instructions specify backwashing and reloading when pressure goes 10PSI above pressure right after backwashing and reloading, which would mean 20PSI for a newly cleaned filter. In my opinion it should be 20 no matter what the post backwash/reload pressure, because if the filter were cleaned, initial pressure would once gain be about 10.

One might think that at 15PSI, the filter would still have removed half the impurities for which the current DE load is capable, and would have half the watermoving capability still intact. My observations tell me that neither is true!

When my pool is well maintained, it can stay below 12PSI for weeks or months. By the time it's 14, even on a well maintained pool, within a couple weeks it will be up to 20PSI. With the drain 3/4 open and the skimmer fully open, at 10PSI the skimmer has a water hurricane and the jets create swirls 4 feet away. At 15PSI, water languidly drops into the skimmer, and the jets produce little or no swirls. At 20PSI, flow at the skimmer is barely detectable. In other words, 15PSI acts a lot more like 20PSI than like 10PSI.

Saying it another way, the best two PSI are the first two PSI. If you give up the filtering and performance that would normally occur between 10PSI and 12PSI, you've given up at least a third of the total. If a brand new reload starts 2PSI above a post-cleaning reload, on my system it's nearing the time for a cleaning. When a reload starts 4PSI above a post-cleaning reload, it's past time for a cleaning.

According to manufacturer's instructions, that means I should backwash and reload at betwee

Filter Cleaning Procedure

Do not attempt a filter cleaning until you've carefully watched a pool professional perform this task on your filter. You should take careful notes. Be aware that your filter will probably be different from mine, so this article is more of a guideline than a set of instructions.

Be sure to read this entire article before attempting to clean your filter.

The remainder of this article contains the guideline for cleaning a DE filter.

Think through the process

Think through the whole process. What tools will you need? Do you have them all on hand? What supplies will you need? Do you have enough gasket grease on hand? Do you have enough DE? Are there any broken things that should be fixed during the process? What parts will need purchase?

Exactly where will you put the grid assembly down, and where will you be washing the individual grids. Where will you place the cleaned grids. Where will you rebuild the grid assembly? These decisions require an area that is free of sharp things that can tear grids, an area in which you don't mind accumulating somewhat poisonous DE (according to its manufacturer, Fiberclear is not poisonous at all), an area where you don't mind releasing large quantities of water, and of course an area accessible to your hose.

How much time the filter cleaning job take? When do you have a block of time enabling you to do this job, even if things go wrong? Personally, I'd devote 6 hours the first time, and 4 hours every time after that. The first time I did this job it took me about 3 hours with my daughter helping, but if things had gone wrong it could have been 6.

Do you need a helper? If so, when can the helper help, and for how long?

Think About a Plan B

What is your plan B? If you can't get the grid assembly back together correctly, do you have someone to call? Is there a pool store open that will help you reassemble, assuming you drive all the parts to them? How much will the pool store charge? Will they try to upsell you to unnecessarily buy new grids, or a brand new filter? If you have to drive grids, do you have a way to transport them without ripping them? What if, during the cleaning, you rip a grid or discover one that has been ripped? Does your local pool store have them in stock, and will they be open when you plan to do the work?

What if the worst happens, and you just can't complete the job during the time you've allocated? How do you store the grids to minimize the risk of damage? How do you store the other parts to minimize loss? How soon later can you return to the job? Is there a pool professional you can pay to finish the job for you if you can't finish it?

My experience with my pool filter indicates that, at least for my Hayward DE4820, the job will go fairly smoothly. Nevertheless, preparation and a Plan B are necessary.

Gather Necessary Tools

To perform this cleaning you will need, at a minimum, a wrench capable of unscrewing a nut (typically 3/8", but who knows). The ideal wrench will be a ratcheting box end wrench with an open end on the other side. Use the ratchet to unscrew it most of the way, and the open end once the nut no longer resists enough to operate the ratchet mechanism. You'll probably also need a moderately sized flat head screwdriver, and maybe a pipe pliers.

If you're doing the job alone, you'll need a large locking pliers or C clamp or some other device that can hold the bolt head at the filter assembly bottom while you're screwing or unscrewing the nut at the filter assembly top. If you have a helper who can hold one wrench, you just need an additional wrench.

You'll need a flashlight to help identify DE muck clogs, and also to help you guide the long bolt that holds the grid assembly together.

You will definitely need a working hose that stretches to your work area, and this hose must end in a hand operated trigger nozzle capable of turning the water on and off at the work end, not at the supply coming out of your house. The ideal nozzle might be one of these new nozzles that has several different settings. I bought one at Walmart for less than $7.00.

Optional Prelims

It's optional, but you might want to backflush and rinse before cleaning. DO NOT RELOAD with DE or Fiberclear, as you'll be getting rid of any residual DE or Fiberclear during the cleaning process, so the new DE or Fiberclear would be wasted.

The benefit of pre-backwashing is the cartridge assembly will be lighter and therefore easier to handle, and also you will get less old DE or Fiberclear in your work area. Another benefit is you can see how much accumulation occurs after backwashing. This can be great feedback when considering whether you performed cleaning too soon, too later, or just at the right time.

The main disadvantage is the backwash process will lower your pool's water level, requiring the addition of water.

Shut off breaker (SAFETY CRITICAL!)

You MUST shut off the circuit breaker to the pump. Shutting it off at the timer is not sufficient. If the timer were to turn on during the process, it could blow the filter casing top into your face, injuring or killing you. If you unscrew the drain plug while under pressure, it could shoot out like a bullet.

If you have a booster pump, make sure the electricity to it is off also.

Relieve pressure (SAFETY CRITICAL!)

Even after turning off all electricity, residual pressure remains in the filter. Once again, when you loosen the belt holding the filter casing top to the filter casing bottom, the pressure could blow the filter casing top into the air, possibly causing injury or death. If the top is 18 inches in diameter, it has an area of PI x 9 x 9, or 254 square inches. At 20 PSI (a modest value typically in normal operating pressure), the upward force on the top would be 5080 pounds -- enough to lift a car.

Turn the knob on the pressure release valve, and do not proceed further until the air stops coming out of the pressure release valve.

Remove drain plug at bottom

You need to drain all residual water out of the filter housing. Do this by opening the drain plug at the bottom of the side wall of the filter. On my Hayward DE4800, there's a large slot for levering with a long rod or long screwdriver.

Notice exactly how filter housing top is mounted

The filter housing top is typically attached to the bottom by a steel belt held together with a long bolt with a nut backed up by a washer. There are probably several ways that belt could be mounted, but what you want to do is put it together the same way it was before. So memorize how it was assembled, which side the nut was on, and if possible, draw a diagram or take a digital snapshot.

Remove filter housing top

Turn the nut on the belt's tightening bolt counterclockise until you can easily remove the belt. If the nut comes all the way off, save it and the backup washer (and the bolt if it falls away) in a safe place.

Notice exactly how the housing gasket is installed

On my Hayward DE4820, the gasket that goes between the filter housing's top and bottom is not round. Its bottom is flat, while its top is somewhat pointed. It's sort of like a triangle with rounded corners, and this is not at all obvious from a simple glance. Whether the gasket sticks to the top or the bottom, take time to look at it, feel it, and determine exactly how it was put on, so when you replace it you can put it on the same way. Otherwise, expect leaks, and possibly even a dangerous situation leading to explosive release of the housing top.

Notice exactly how grid assembly is mounted

Notice how the grid assembly is mounted, because you'll have to put it back exactly the same way. On MY filter, the top of the grid assembly has spikes coming out, and tubes beneath it, and the grids below the tubes. The top, which is the spike and tube structure, is held on by a nut and backup washer, mounted to a long bolt that goes all the way through the grid assembly. DO NOT unscrew the nut while the grid assembly is still in the housing.


The top of the filter assembly has spikes, and is composed of tubes. Note the large tube that pressfits onto the white filter return pipe.

Pre wash grid assembly in the housing (optional)

Large clumps of muck will likely have grown between the grids, weighing down the grid assembly and making it harder to pick up the grid assembly. By hosing between the grids, you can knock out a lot of that muck, making it easier to pick up the grid assembly. The disadvantage is that water and used DE will flood the area of the filter, which is usually located near the house's foundation. Weigh the benefits and risks.

Pull out grid assembly

Pull the top of the grid assembly straight up. The difficulty of removal depends on two things:
  1. The weight of the grid assembly.
  2. The tightness of the pipe press fit.
If there's little muck, and if the press fit isn't tight, it should lift out fairly easily. Additional DE weight makes it harder, but still straightforward. What makes it difficult is if the press fit of the pipe into the grid assembly top is tight. In that case, lifting hard on the grid assembly will lift the lower filter housing, which isn't at all good for the piping in general. Having DE weight just complicates the problems from the tight press fit.

If you have a tight press fit, my first step is to lift the grid assembly to the point just before the filter housing would rise, and then wiggle and twist the grid assembly. The twist would occur with the pipe at the diameter of the twist, while pulling up. Repeatedly wiggling and lifting a little harder can often free things up. Given the difficulty of all this, the benefits of prewashing might now outweigh the risks.

Set down the grid assembly

While you were doing your preliminary thinking, you came up with an area in which you wanted to set down the grid assembly, and a nearby area where you wanted to wash the individual grids. Carry the grid assembly to the place where you decided to have the grid assembly. Stand it up on flat, level ground, preferably soft grass. There should be no thorns or other sharp or rocky objects that could penetrate the grid mesh. Do not let it fall, or your grids could be punctured. Grids are very expensive.

Grid assembly standing
  
The techician has removed the grid assembly and stood it, on its bottom, in a flat, grassy work area.

Inspect and pre-clean grid assembly if necessary

Taking care not to let the assembly fall, look between the grids. Is there built up sludge? Built up sludge between or around grids makes it much harder to pull those grids out of the top piece, because the grids are effectively stuck to each other and can't easily be wiggled or turned to remove the press fit. If there's built in sludge, wash it out as best you can with a hose and nozzle, taking special care not to have the grid assembly fall.

Lay grid assembly on its side

Very gently tilt the grid assembly and lay it down on its side, so both the top and bottom are visible and accessible.

Grid assembly lying down
  
The technican lays the assembly flat in preparation to remove the top, and then the grids.

Notice exact configuration of grid assembly bottom

On my filter, the bottom is just strands of plastic. The bottom has gap aligned with main tube of top. The bottom has long bolt through it. If at all possible, take digital photos or make diagrams, because getting the grid assembly back together after disassembling it is by far the hardest part of this job.

Be sure to note that one of the grids is not as wide as the rest. This particular grid butts up against the return tube connector in the top of the grid assembly.


Grid assembly lying down
  
The bottom of my filter is strands of plastic, some orbital and some radial. You can see that the gapped section of the bottom is directly in line with the return tube of the top. This is necessary to accomodate the supply pipe in the housing.

Notice also that the two grids that end in the gap end at the same place. This is because the inner of these two is the short grid. If it were as long as the rest, it would bump into the top's return tube.

Remove nut and washer from top, save carefully

Use your wrench to remove the nut and washer, and save the nut and washer carefully. If the nut has friction against the bolt's threads, the bolt will need to be held in place. That can be done with an assistant with a wrench, of if you're doing it yourself, with a large locking pliers or perhaps a C clamp.

Once the nut and washer are removed, the grid assembly might "fall apart", but because it was already laying on the ground, it won't fall far enough to be damaged. If it doesn't "fall apart", gently pull the bottom out from the assembly, and the whole thing will fall apart. Now it's time to wash the grids.

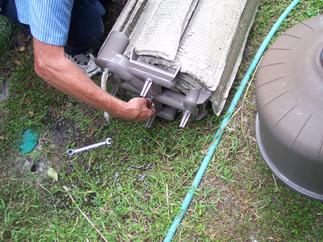
Removing the top of the grid assembly
  
Here the technican removes the top of the grid assembly by loosening the nut. He will later remove and carefully store the nut and its backup washer, and then very gently remove the top.

Remove and wash each grid

Be very careful not to tear any grids. They're very expensive. Each grid has a pipe sticking out of it. This pipe goes to the top, and eventually to the filter return.

Grid removal from the grid assembly top might be difficult. If it is, be sure to wash out any DE stuck between the grid you're pulling out and the other grids. Then, wiggle the grid so its pipe wiggles in the assembly top's hole, and slowly wiggle and pull until it comes free. If the pulling starts to cause the whole assembly to slide on the grass, get an assistant to hold the assembly top, of hold the top with one hand and wiggle and pull the grid with the other. Sliding parts across the grass risks tearing a grid. You'll need to clean each of the grids (my filter has 8 of them).

Once you have the grid in your hand, assuming you're right handed, hold the end without the pipe in your left hand, gently rest the pipe end on the ground, and with your right hand operate the hose to remove all traces of DE/Fiberclear from the grid's mesh. Hose both sides. The reason it's important for the pipe to be down is so that water caught inside the grid runs out the pipe. Otherwise, the grid would have a tendancy to fill up, and any twigs, leaves or other junk trapped within it would migrate to the bottom, where it would be hard to remove.

A narrow spray of water is probably best, as long as it isn't so powerful to risk damaging the grid mesh. The most time-effective strategy is to clean large areas with the nozzle held a couple feet from the grid surface, and then once the entire grid is relatively clean, go after dark spots with the nozzle held a few inches from the grid surface. Only after most of the muck is cleared away will you see the real bad spots.

Some areas will have leaves, twigs and other junk inside the grid. This probably happened during backwashing. Try to use your water stream to dislodge such junk, hopefully letting it run out the the pipe. Also, be sure to hose off the grid sides, bottom and top, and its pipe. After spraying inside its pipe, once again try to dislodge junk on the inside. Note that unless your grids are almost new, you'll not be able to dislodge and remove all the junk inside the grid. That shouldn't significantly affect your ability to filter.

My experience tells me that cleaning an individual grid takes 5 minutes or less. It's not a particularly difficult job. It probably takes one minute to remove most of the muck, with the rest of the minutes going toward removal of problem stains and internal junk.

Cleaning a grid
  
The technician uses a nozzle with a narrow spray to remove all the glommed on DE (or Fiberclear). He sprays it until it's fairly clean, as you can see. He will spray both sides. Notice that the end with the pipe rests on the ground. This is so water trapped within the grid can drain through that pipe.


Clean top assembly

The top of the grid assembly consists of pipes that suck the contents out each grid. Since my filter has 8 grids, the top assembly has 8 holes to press fit on those pipes, and one large pipe to press fit over the filter's return pipe. It also has a small hole in the center to accommodate the long bolt. The center hole must also be cleaned.

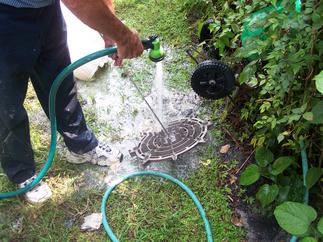
Cleaning the grid assembly top
  
The technician cleans all the pipes in the grid assembly top by spraying his nozzle into each hole and pipe, including the center hole and the large return tube (upperleft most part of the top in this photo. The technician will also clean the outside of the top. Note that in this photo the top is upside down, so that the spikes are down on the ground.

The grid pipe holes are in pairs. My experience is the best cleaning takes place when I keep the other hole lower than the hole into which I'm spraying. Make sure to get all residual DE and muck out of all piping.

Clean bottom assembly

Cleaning the bottom of the grid assembly is pretty straightforward. Spray off all the caked on DE. The assembly bottom has no piping to clean out.

Cleaning the grid assembly bottom
  
The technician cleans the bottom assembly with the hose. Note that the long bolt is still through the middle of the bottom.

Clean out filter housing

Use a narrow spray to get all DE out of the filter. Because you earlier removed the drain plug, it will run right out the drain into the surrounding grass.

Reassemble grid assembly

This is the tough part, ladies and gentlemen. Unfortunately I didn't get pictures of this part of the process, so I'll describe it in English.

Find and Separate the Short Grid

As mentioned many times, one of the grids is narrower in width. Separate out this special grid, once again taking care that nothing scratch or damage it.

Place top on ground, with tube holes up

That means spikes down. You do this so that you can push the grid pipes into the holes around the radius of the top. By pushing the spikes into the earth, you can stabilize the top to accomdate further assembly.

Place grid pipes in the tube holes

Before beginning, notice any notches in the pipe or nipples within the tube in which the piping is inserted. On my Hayward DE4820, the end of each grid pipe has cutouts corresponding to nipples on the inside of the grid tubes of the assembly top. These nipples and notches assure that the pipe can't go in at the wrong angle. Failure to see something like that could cause breakage of the grid pipes or the assembly top, as well as contributing to general frustration.

The grids are curved, so be sure to put the grid pipes in the holes in such a way that the grids in general describe a circle. 

The grids should describe a circle
  
The grids should describe a circle. The short grid (in this picture the leftmost grid touching the technician's left leg) goes where a long grid would bang into the top's return pipe.

While inserting them, if a grid bangs into the top's return pipe or is interfered with by the top's return pipe, remove it and insert the short grid in that place. The purpose of the short grid is to make room for the return pipe.

Once you've inserted all 8 grids, and verified that the short grid is where it does not impact the return pipe, you need to make sure that all 8 grids are seated all the way within their respective assembly top tubes. It's likely that one or more will be "sticking up", which will prevent correct seating of the bottom. If any appear to be "sticking up", what I personally do it is to gently tap the tube bottom of each grid until they're all firmly and snugly seated within their respective tubes, and all their bottoms appear to be at the same height.

Once all grids are properly placed, you're ready to affix the bottom, which is by far the hardest single operation of filter cleaning.

Place bottom assembly on top

Take your time performing this step. Be very gentle. The first time you do it, be prepared to spend an hour or two on this step alone. If you cannot complete it within a couple hours, call a pool professional, or very carefully load all parts of the grid assembly in your car and very carefully, without damaging the grids, drive it all to your pool store.

Guide the bottom on top of the standing grid assembly.
The grids should describe a circle
  
The standing grid assembly.

Note that it's actually standing on the top, so it's currently upside down.

Flip the bottom section so its guides face the grids. Turn the bottom so the section without a framework is directly above the top's return pipe. Now you need to fit the bottom.

Typically one half of the bottom will mesh more or less perfectly with the grids. Your job is to slowly and carefully align the grids on the other half with the notches in the bottom. Work slowly, gently, carefully and patiently. Rough handling can tear a grid. If you become frustrated STOP AND COOL OFF!!! Performing this task while frustrated is likely to cause expensive damage to your filter parts.

What can help is to back off and examine the bottom and its grid connection by rings.  The bottom consists of several rings and corresponding grid guides. I make sure the inner ring's guides all grab a grid, then try to do the same with the outside ring. Then I go around in the middle rings, moving grids slightly so they "fall into place".

You'll know when you've mounted the bottom correctly because the bottom will fall down to a lower point, and will be snug against ALL the grids. If one part of the bottom sticks up, you still have some adjusting to do.

Once the bottom is fitted correctly, I put the long bolt backup washer over the center hole on the assembly bottom, and I put the long bolt through the center of the assembly bottom., and using my flashlight to guide me as I put it through the center hole of the assembly top. If you're doing the job alone, affix your large locking pliers to the head of the long bolt to keep it from turning. If you're working with an assistant, make sure to hand a wrench to the assistant so he or she can grab hold of the bolt head when you tighten the nut. Make sure you have a wrench, capable of tightening the nut on top, in your hand or pocket, as well as the long bolt's nut and its other backup washer. Remember, once you turn the assembly on its side, it will tend to come apart and ruin your alignment work. From the moment you tip the assembly, it's necessary to constantly keep pressure between the top and bottom and the grids, and quickly tighten the nut.

With a wrench, nut and washer in your pocket and the locking pliers on the long bolt's hex head, place one hand on the bottom, the other half on the top, and very carefully lay the whole assembly on its side, all the while keeping pressure on both top and bottom to keep them pressed into the grids. Place one leg against the assembly top, and the other leg against the bottom, and apply pressure with your legs so that you can remove your hands. Make sure the leg near the bottom prevents the

On the top side, place the backup washer over the bolt, and then gently screw on the nut and washer until the washer comes to rest on the top. Do this while assuring the bottom is still mounted correctly. I'm not sure how to assure that, so this is something you'll need to figure out. If you figure it out, please email me.

Once the washer is against the top, verify that the bottom is still mounted correctly, with all grids snugged into their proper places, and nothing loose or high. If so, slowly and carefully tighten the nut more. The nut should be tightened to the point where no grids wiggle or wobble, but no tighter. You've just completed the toughest part of the filter cleaning process.

Remove the locking pliers from the hex head at the bottom! Installing with the locking pliers attached would at the least create corrosion problems which could cause the bolt to fail, and might also harm various parts of the filter. It could possibly even cause the filter housing top and bottom to join wrong, which could cause explosive separation and injury or death at a later date.

Rewash grid assembly

Your grid assembly has been cleaned, but it has also been resting on the muddy ground. It needs a final cleaning.

Final cleaning of the grid assembly
  
Now that the grid assembly has been reassembled, the technician turns it right side up (bottom is now on the ground) and cleans all accessible areas with a narrow stream nozzle.

Replace grid assembly in housing

Cover with gasket grease the top outside of the pipe inside the filter assembly, and the inside of the tube that goes over the pipe. This will help the pipe press fit, and will also make the rubber gasket on the pipe more waterproof.
Look where the return pipe is in the filter housing. The return pipe on the grid assembly top will fit over that. Turn the grid assembly so that you can simply lift and place. Then carefully lift the grid assembly, and lower it into the shell, making sure that the return pipe on the grid assembly top slides over the return pipe inside the housing.

The pipe might not completely slide into the tube. Wiggle the grid assembly while pressing down, and everything should seat properly, especially because you used gasket grease to ease the way.


The technican mounted the grid assembly inside the filter. Note that the (gray) return pipe from the grid assembly has slid over the (white) return pipe inside the housing.

Replace filter housing top (SAFETY CRITICAL!)

Unless your filter housing top is mounted and attached properly, normal working pressure of the pump can cause it to blow off. As mentioned before, with 20psi, the force on an 18 inch diameter top would be 5080 pounds -- enough to lift a car.

First, verify that the rubber gasket is still mounted around the outside of the lip of the housing bottom. You might want to remove and clean the gasket, but if you remove it, be careful to observe exactly how it's put on so you can put it back the same way.Coat the gasket with the proper gasket grease. Make sure the gasket hasn't stretched to the point where it won't seal.

Filter housing gasket
  
In this photo you see the round housing gasket wrapped around outside of the filter housing lip. The whitish looking material on the otherwise black gasket is gasket grease. Please click the photo to see a much more detailed picture.

Once the gasket is in place, place the top over the bottom, trapping the gasket between the bottom and top. This might be difficult and require some jockeying. Make sure the top is pointed in the same direction as before, with the pressure gauge pointed the same direction as before.

Once the top is placed correctly, clean the steel belt with the hose, place it in the same position as it was originally in, then place the backup washer and nut and begin to tighten. Once the belt begins to snug, every couple turns of the nut, gently tap all around the belt so it seats correctly. Continue tightening and tapping until the spring is completely compressed, or as per manufacturer's instructions.

The belt must be on tight enough to hold pressure. Follow manufacturer's directions. If the belt is not on correctly, the top can blow off and hurt or kill somebody.

Replace drain plug at bottom (SAFETY CRITICAL!)

Screw it back in all the way. Be careful not to strip threads. If the drain plug is not in place, water will flood out the drain hole once the pump is energized. If the drain plug is not screwed in all the way, it will leak, or possibly blow out like a bullet.

Verify that pressure relief valve is open (SAFETY CRITICAL!)

You want to make sure that the pressure relief valve is open for two reasons. First, you need to purge the air from the system. Second, in the event of a badly mounted filter top, having the pressure relief valve open might slightly lower the pressure.

Verify that pool has enough water

The pool's water must cover the skimmer, or else the skimmer will suck in air, causing the pump not to prime. Run a hose into the pool at full blast, because your first step will be a quick backwash and rinse.

Roll out your backwash hose into the street or driveway

You want to make sure the water goes away from your house, foundation, and you.l

Put multiport valve in "backwash" setting

You're about to backwash.

Turn on breaker and any other switches for main motor (SAFETY CRITICAL!)

Be sure no part of your body is above the filter when you turn on these switches. If the filter top blows off, you don't want it to hit you. Because part of the top can release before another part, it's possible for it to open like a door rather than blow straight up in the air. For that reason, stay as far from the filter as possible when turning on the pump. Once it's turned on, move several feet away until the pump has been operating at full pressure for a minute or more and appears to be OK.

Watch for leaks

If you see any leaks around the seal between the housing bottom and top, or if you see leaks near the drain plug, shut it down. Tighten or remount the steel belt if there's an obvious problem with it. Otherwise, call a pool professional.

After the pressure relief valve sprays water, close it

Whenever the air is purged from the system, the pressure relief valve will spray water. At that point, close it, keeping all parts of your body as far from the filter as possible (in other words, only your hand is above the filter), and take as little time as possible closing the pressure relief valve.

Backwash for 30 seconds

You just want to purge any dirt or gravel the grids collected on the ground. The grids themselves have been cleaned and do not need extensive backwashing. Don't start counting seconds until a significant water flow comes out the hose. The first few seconds air from the filter will come out the hose.

Shut off the pump, and Rinse for 20 seconds

Rinse for 20 seconds to get any junk out of the interior of the grids. Then shut off the pump.

Create an amalgam of FiberClear or DE

You want to minimize the time during which the system operates without DE powder, so prepare an almalgam of DE or Fiberclear in an appropriately sized bucket.

Put multiport valve in "filter" setting

When you finally load your Fiberclear or DE, you will want the system in the "filter" setting.

Set skimmer to suck water

Because you'll be adding DE through the skimmer, you want the skimmer sucking water. Make sure the drain/skimmer valve is set at least midway, or more toward the skimmer. You might even want to turn off the drain to maximize suction at the skimmer.

Turn on the pump, and wait for the jets to stop major bubbling

Theoretically, you should have already purged your system of air, but if not, wait until the jets stop major bubbling. Minor bubbling is fine, but if you see three inch diameter bubbles coming out, wait for them to shrink.

Add Fiberclear or DE amalgam slowly to skimmer

Once the major bubbling has subsided, slowly pour the DE or Fiberclear amalgam into the skimmer. If it becomes so thick as to be clumpy, add more water to the bucket and pour again.

Note and record the new filter pressure

The pressure indicated by your pressure gauge is your new baseline pressure, both for purposes of backflush/reload, and for purposes of determining the necessity of the next filter cleaning. When (probably weeks later) the pressure rises to a 10 PSI above the baseline, it's time to backflush, rinse and reload. Note that the 10 PSI figure is for my filter, your figure might be different. Check with your manufacturer documentation.

When, after a complete backwash and reload, the pressure is three to four PSI above the post-cleaning value, it's time for another filter cleaning.

Top of Page