Troubleshooters.Com and Steve Litt's Guide to Transportational Bicycling Present

   Adjusting V Brakes

Copyright (C) 2007 by Steve Litt
CONTENTS:


DISCLAIMER

The information in this document is information is presented "as is",  without warranty of any kind, either expressed or implied, including, but not limited to, the implied warranties of merchantability and fitness for a particular purpose. The entire risk as to the quality and performance of the information is with you. Should this information prove defective, you assume the cost of all necessary servicing, repair, correction or medical care.

This page discusses the maintenance of bicycle brakes. A loss of braking power could lead to death or severe injury, especially on hills or in traffic. Your V Brakes may not match the one described in this document. This document may not clearly express the assembly of the brake it describes, or may even contain errors. We are not responsible. If you use the information in this document, you take full responsibility for the outcome. If that is not acceptable to you, please do not read this document.

In no event unless required by applicable law or agreed to in writing will the copyright holder, authors, or any other party who may modify and/or redistribute the information, be liable to you for damages, including any general, special, incidental or consequential damages or personal injury arising out of the use or inability to use the information, even if such holder or other party has been advised of the possibility of such damages.

If this is not acceptable to you, you may not read this information.


Introduction

I'm Steve Litt. I created the Universal Troubleshooting Process (UTP). I create and license UTP courseware, as well as teaching the UTP onsite. I've written five books on troubleshooting:
Past professions include software development, electronic repair, corrosion engineering, and bicycle repair.

I currently ride my bike about 30 miles per week. That probably doesn't sound like much to someone reading this website, but it adds up to 1500 miles per year -- enough to wear out a lot of components and even whole bicycles in a few years.

I also take care of my three childrens' bikes, two of which have V brakes. V brakes provide tons of stopping power when adjusted right, but adjusting them right can be tricky, and they can come out of adjustment frequently. Furthermore, if pivot friction gets into the system, they become almost uncenterable. Discount store bikes often come with cheap V brakes susceptable to pivot friction.

This document briefly outlines the steps to adjusting V brakes, and getting it right the first time.

What Are V Brakes?

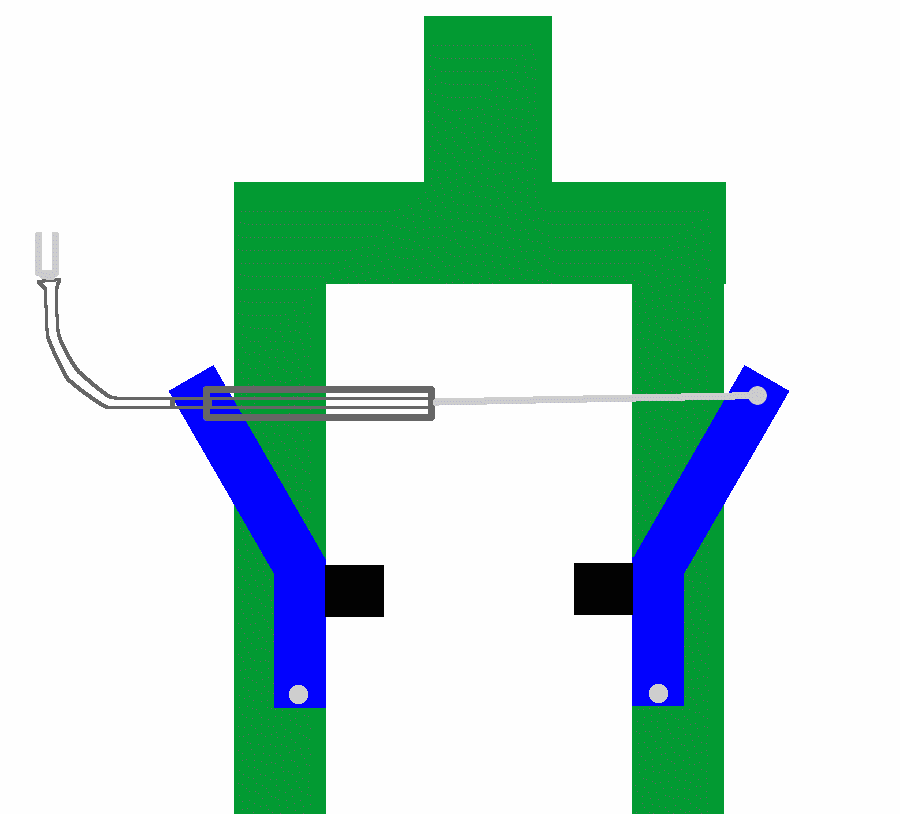
V brakes picture V brakes have two pivots, each attached to the fork or a horseshoe shaped implement attached to the fork. They use a single cable coming in from the side rather than a transverse (Y shaped) cable from above.

V brakes typically have very high mechanical advantage, meaning that you need to pull a lot of cable to get the brake shoes to move just a little bit. This means that on a perfectly adjusted bike, V brakes are incredibly powerful, capable of flipping the bike. However, if things come just a little bit out of adjustment, braking power decreases dramatically.

V brakes require significant maintenance.

About Flipping the Bike

"Flipping the bike", sometimes also called "standing the bike up", happens when you activate the front brakes so hard that the bike stands up on the front wheel and you go over the handlebars. It's dangerous and can result in a broken neck, paralysis or death. In my neighborhood I saw a child flip her bike just that way, and it was scary. My son flipped his bike by hitting the front brakes too hard, and broke his shift lever (he was fine). In the hands of a child, a front brake capable of flipping the bike can be dangerous.

On the other hand, I try my best to make sure my front brakes can flip the bike, or at least come close. I do that because often flipping the bike is the best of several bad options. While whipping down Lincoln Blvd at 20 mph, some space cadet lady threw her car door open right in front of me. I slammed on the front brake, flipped the bike, flew over her car door, and got all cut and bruised. If my brakes had been less strong, I might have hit her car door and gone through the glass on her door (I did that once on Clark Street in Chicago). Flipping the bike was the lesser of two evils.

Then there's the fact that, in the real world, brakes aren't always perfectly adjusted. A brake that can flip when perfectly adjusted can still haul you down to a quick stop when a little out of adjustment. A brake that can't flip you just slows you down when misadjusted.

Similarly, a flip-capable front brake can quickly slow you down when your rims are wet -- a lesser brake might let you coast into disaster.

When using a powerful front brake, brace yourself against the handlebars with straight arms, get your body as low and as far back as you can, and hit the brakes with only enough force to avoid the danger. Strong brakes are controllable. 99% of the time you'll use only a small fraction of the braking power. The times when you'll use it full out is when someone opens a car door in front of you, left turns you, curb-squeezes you, or stops suddenly in front of you. If you can't stop as quickly as a car, you're at a disadvantage on the road.

Bottom line -- little kids are probably safer with less powerful front brakes, but adults capable of going 20 miles per hour are probably safer with the strongest possible front brakes, as long as the adult learns to properly control the brakes.

V Brake Hierarchy

There's a hierarchy of adjustments necessary for V brakes:
  1. You can't position the brake pads if you haven't centered the wheel.
  2. You can't position the brake pads if you haven't adequately trued the wheel.
  3. You can't reliably center the brakes if you haven't removed pivot friction.
  4. You can't center the brakes if you haven't positioned the brake pads.
  5. You can't adjust brake tolerances if you haven't centered the brakes.
Armed with the preceding hierarchy, you can now define a sequence of adjustments. In this case we'll define two adjustment sequences -- one for a temporary road repair, and one for maintenance done at home with tools and time.

Full Maintenance

Here's the sequence for full maintenance:
  1. True the wheel (to within 1/8 inch or better if possible).
  2. Center the wheel.
  3. Check for pivot friction, and eliminate it.
  4. Properly position brake pads.
  5. Center the brakes.
  6. Adjust the brakepad to rim gap.

True the wheel (to within 1/8 inch or better if possible).

You'll need a spoke wrench. These instructions are only for mild side to side wobbles. For severe "pretzelled" or "egg shaped" wheels, find more complete instructions elsewhere on the Internet.

  1. Spin the wheel to find the spot most out of true sideways, and estimate how much of the wheel's arc are out of true at that spot.
  2. In the

Center the wheel.

Loosen the nuts (bolt on wheel) or loosen the quick release mechanism, press down on the fork, use one hand to center the wheel between the fork blades, and retighten while keeping the wheel centered.

Check for pivot friction, and eliminate it.

The following four steps define a sequence of increasingly difficult, expensive actions. Go only as far as necessary to get control of pivot friction. In other words, after squeezing the brake handle the brake pads and brake arms should return to the same place, even if previously they were manually pushed to one side (with your hand)...
  1. Manually move the brakes off center, squeeze the brake handle, and verify that the brake arms and brake pads reliably come back to the same place. Repeat several times, manually pushing the arms to opposite sides. If they don't come back to the same place, continue.
  2. Lubricate as necessary and retest. If they still don't reliably center, continue.
  3. If necessary, disassemble and grease, then put together tight and use temporary locking compound on the bolts to prevent them from coming loose. Test. If they still don't reliably center, continue.
  4. Buy new brakes or cannibalize brakes from a higher quality bike (obviously one that you own).

Properly position brake pads.

Check the position of the brake pads by squeezing the brake arms together until the brake pads contact the rim. If both brakepads hit the rim and only the rim, square on the rim, they're properly positioned. Otherwise, loosen the bolt securing each, and with the brake arms pulled to engage the pads on the rims, adjust each so it's parallel to the rim, its surface meets the rim flushly, and it neither hits the tire nor hits the inside edge of the rim. Adjust one brakepad at a time.

Center the brakes.

Use the centering screws if possible. Screwing a centering screw clockwise pulls its brakepad away from the rim, and therefore pulls the other brakepad toward the rim. Screwing counterclockwise does approximately the opposite. If it cannot be done with the screws, you might need to disassemble the brakes and change the hole into which the brake spring plugs in. This is a fairly complex procedure and you might be better off bringing it to a bike shop.

Adjust the brakepad to rim gap.

Do this with the brake's barrel adjuster if possible, otherwise loosen the nut that grabs the cable, and adjust the cable either looser or tighter.

Top of Page